19 Sep'25


Salestio kann eine Verbindung zwischen bereits vorhandenen Marketplace-Artikeln und Produkten in Ihrem E-Commerce-Shop herstellen. Um die Produktpaare zu finden, vergleicht die App die Produkt-SKUs und sucht nach einer Übereinstimmung. Standardmäßig synchronisiert Salestio Mengen und Bestellungen für Artikel mit derselben SKU. Manchmal kann dasselbe Produkt auf einigen Plattformen eine andere SKU haben. In diesem Artikel werden wir die in Salestio verfügbaren Tools besprechen, die bei der Zuordnung der Produkte helfen können.
SKU-Zuordnungen können auf zwei Teile von Salestio angewendet werden:
- Produktpaarungen für den Bestellimport auflösen. Wenn eine Marketplace-Bestellung importiert wird, sucht die App in der Zuordnung nach den Artikeln, um eine Übereinstimmung aus dem E-Commerce-Shop zu finden und eine Bestellung zu erstellen.
Vollständiger Artikel: Optimierung von Bestellimporten mit SKU-Zuordnung in Salestio
Diese Funktion wird für Amazon-, eBay- und Etsy-Integrationen unterstützt. - Marketplace-Angebote mit Shop-Artikeln für die Preis- und Bestandssynchronisierung verbinden. Die Zuordnung der Produkte auf diese Weise ermöglicht die Verknüpfung der Produkte über Salestio > Inventar-Tab. Detaillierte Schritte zum Verknüpfen der Artikel mithilfe der SKU-Zuordnung finden Sie in der folgenden Anleitung:
So verbinden Sie E-Commerce-Shop- und Amazon-Produkte, wenn die SKUs nicht übereinstimmen
Diese Funktion wird für die Amazon-Integration unterstützt.
So fügen Sie eine SKU-Zuordnung hinzu
Salestio bietet zwei Möglichkeiten, Artikel zu einer Zuordnungsdatei hinzuzufügen. Der Editor ist hilfreich, um ein paar Artikel anzupassen, und der CSV-Datei-Upload ermöglicht es, Änderungen für große Sammlungen auf einmal vorzunehmen.
Einzelne Artikel hinzufügen
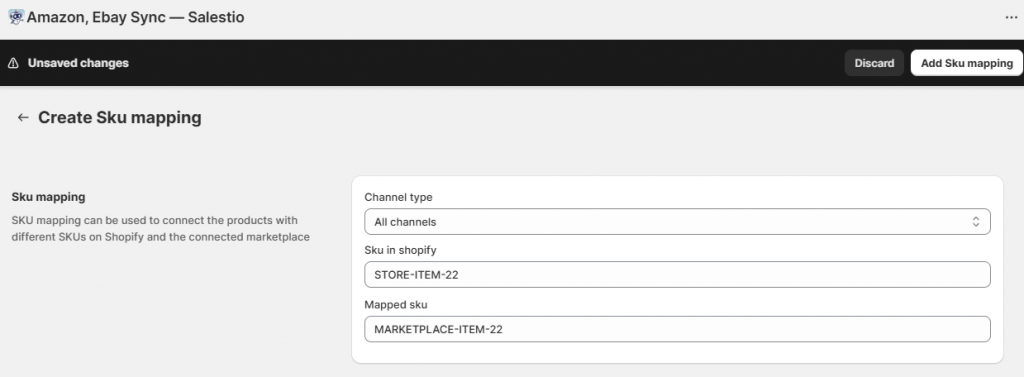
Um eine Einzelprodukt-Zuordnung hinzuzufügen, gehen Sie zu Salestio > Profile > Sku-Zuordnung-Tab und klicken Sie auf „Sku-Zuordnung hinzufügen“. Hier können Sie angeben, ob der Artikel für alle verbundenen Marktplätze oder ein bestimmtes Amazon/eBay/Etsy-Konto zugeordnet werden soll. Fügen Sie die Shop-SKU, die Marketplace-SKU hinzu und speichern Sie die Änderungen. Fertig!
Sie können auf diese Weise mehrere Artikel hinzufügen, und alle neuen Einträge werden in Profile > Sku-Zuordnung-Tab angezeigt.
Um eine solche Zuordnung zu entfernen, wählen Sie sie in der Liste aus und klicken Sie oben auf „Löschen“. Alternativ können Sie diesen Artikel in Salestio > Inventar-Tab suchen, ihn auswählen und auf „Zugeordnete Produkte entfernen“ klicken. Die Verwendung des Inventar-Tabs ist hilfreich, um mehrere ausgewählte Produkte aus der Zuordnung zu löschen.
Eine Zuordnungstabelle hochladen (für Massenoperationen)
Wir empfehlen, eine Tabellenkalkulations-App zu verwenden, um eine Zuordnungsdatei zu konfigurieren. Erstellen Sie eine Tabelle mit zwei Spalten: Shop-SKU | Marketplace-SKU. Fügen Sie jeden Artikel in einer neuen Zeile hinzu und speichern Sie diese Tabelle als CSV-Datei. Überprüfen Sie das folgende Beispiel:

Wie bei einzelnen Zuordnungen kann die Datei auf alle Kanäle oder nur auf eines der verbundenen Konten angewendet werden. Für alle Kanäle gehen Sie zu Salestio > Einstellungen und fügen Sie die Zuordnung unten hinzu. Um die Zuordnung für ein bestimmtes Konto hinzuzufügen, wählen Sie zuerst das Konto auf der linken Seite der Einstellungsseite aus.
Um in Zukunft neue Artikel hinzuzufügen, aktualisieren Sie Ihre Datei mit neuen Zeilen und laden Sie sie erneut hoch. Die neue Zuordnung überschreibt die alte Datei.
Um die CSV-Zuordnung zu entfernen, kehren Sie zu dieser Seite zurück und klicken Sie auf „Datei löschen“.

Wenn Sie Amazon-Produkte über den Inventar-Tab in Salestio synchronisieren, sollte die Datei nach dem Herunterladen der Marketplace-Produktliste hochgeladen werden (Salestio > Inventar > Inventare herunterladen). Denken Sie nach dem Verknüpfen der Produkte daran, die Aktion „Preis & Menge aktualisieren“ aus der Verkaufsliste auszuführen, um eine erste Synchronisierung durchzuführen.
Finden Sie Salestio im Shopify App Store, um eine kostenlose 30-Tage-Testversion zu starten.
Haben Sie Fragen? Sie können sich gerne an das Team unter support@salest.io wenden.