19 Sep'25


Salestio can establish a connection between already existing marketplace items and products in your e-commerce store. To find the product pairs, the app compares the product SKUs and locates a match. By default, Salestio syncs quantities and orders for items that have the same SKU. Sometimes, the same product can end up with a different SKU on some platforms. In this article, we will discuss the available tools in Salestio that can help with matching the products.
SKU mappings can apply to two parts of Salestio:
- Resolve product pairings for order importing. When a marketplace order is imported, the app will look up the items in the mapping to find a match from the e-commerce store and create an order.
Full article: Streamlining Order Imports with SKU Mapping in Salestio
This feature is supported for Amazon, eBay, and Etsy integrations. - Connect marketplace listings with store items for price and stock synchronization. Mapping the products this way allows linking the products from Salestio > Inventory tab. For detailed steps on linking the items using the SKU Mapping, check the guide below:
How to connect e-commerce store and Amazon products when SKUs don’t match
This feature is supported for the Amazon integration.
How to add an SKU Mapping
Salestio offers two ways of adding items to a mapping file. The editor is helpful for adjusting a couple of items, and the CSV file upload allows making changes for big collections at once.
Add individual items
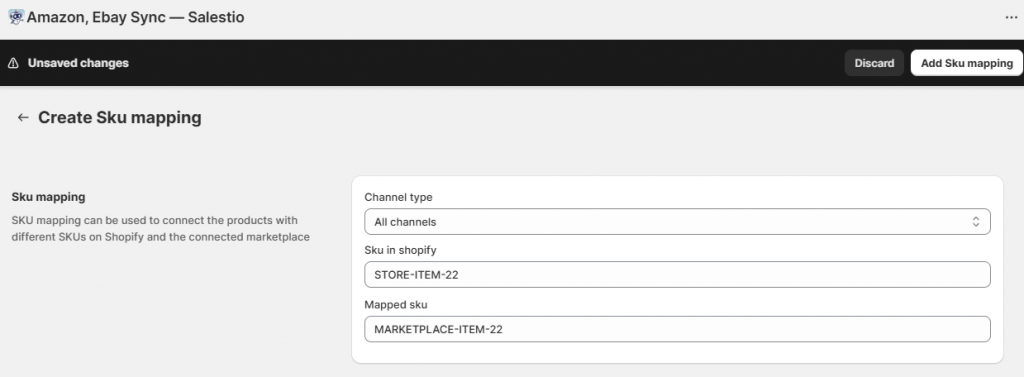
To add a one-product mapping, go to Salestio > Profiles > Sku mapping tab and click “Add Sku mapping”. Here, you can specify if the item should be mapped for all connected marketplaces or a specific Amazon/eBay/Etsy account. Add the store SKU, marketplace SKU, and save the changes. Done!
You can add multiple items this way, and all new entries will appear in Profiles > Sku mapping tab.
To remove a mapping like this, select it in the list and click “Delete” at the top. As another option, find this item in Salestio > Inventory tab, select it, and click “Remove mapped products”. Using the Inventory tab is helpful for deleting multiple selected products from the mapping.
Upload a mapping table (for bulk operations)
We suggest using a spreadsheet app to configure a mapping file. Create a table with two columns: Store SKU | Marketplace SKU. Add each item in a new row and save this table as a CSV file. Check the example below:

Same as individual mappings, the file can be applied to all channels or only one of the connected accounts. For all channels, go to Salestio > Settings and add the mapping at the bottom. To add the mapping for a specific account, first select the account on the left side of the settings page.
To add new items in the future, update your file with new rows and upload it again. New mapping will overwrite the old file.
To remove the CSV mapping, return to this page and click “Delete file”.

When syncing Amazon products through the Inventory tab in Salestio, the file should be uploaded after downloading the marketplace product list (Salestio > Inventory > Download Inventories). After linking the products, remember to run the “Update Price & QTY” action from the Selling List to perform an initial sync.
Find Salestio in the Shopify App store to start a Free 30-Day Trial.
Do you have any questions? Feel free to reach out to the team at support@salest.io.