01 Aug'25


Today, we will explore how to expand your Shopify store to Etsy using Salestio. In this guide, we will share the steps to the Shopify inventory listed on Etsy and set up sync between the two platforms.
- Add an Etsy account
- Configure the Global Profile (Optional)
- Add a Creation Profile
- Customize the Description Template (Optional)
- Create a Selling List
- Export the products to Etsy
Add an Etsy account
Start by adding your Etsy account to Salestio. To do so, go to the Accounts tab and click the “Add Account” button. You will be redirected to a new account page.

Pick a name for the account and click “Add account” at the top. The app will redirect to Etsy for authorization. Read the agreement and grant access for Salestio.
Then you will be redirected back to Salestio. Click “OK” in the pop-up window, and let’s proceed with the rest of the configuration.
Configure the Global Profile (Optional)
Global Profiles hold sets of rules that define how Shopify price and stock will be sent to Etsy. Salestio allows customizing stock and prices in different ways. If nothing is set specifically, Shopify products will be exported to Etsy with the exact same price and stock as on Shopify. On the screenshot below, the price ratio is set to 1.2. It means that Etsy products will be displayed at a 20% higher price than on Shopify.

A “Default” Global Profile is added after you install Salestio in the store. You can modify it or create a new one. To create a new Global Profile, navigate to the Profiles tab, select Global Profiles, and click “Add Profile”.
Learn more about Global Profile customizations:
Customize marketplace pricing
Customize quantity for syncing products
Add a Creation Profile
The Creation Profile in Salestio is a way to create and extend Etsy listing information with extra details and place the product into the correct category on the marketplace.
Setting up a Creation Profile is required for listing new items on Etsy through Salestio. It means that the Creation Profile should be added before setting up a Selling List.
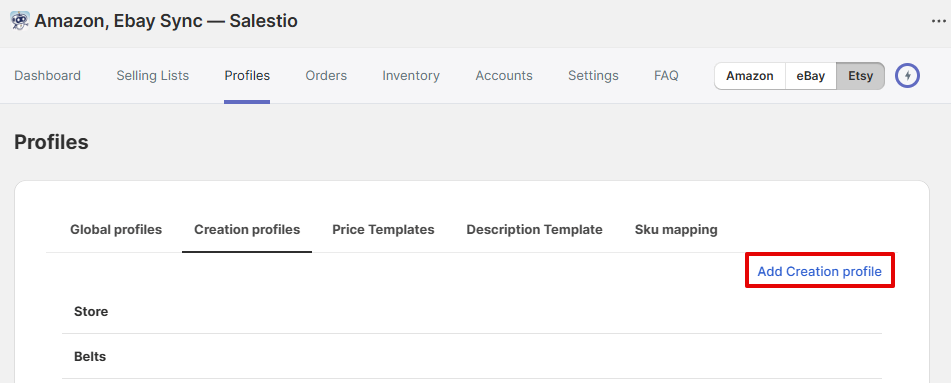
To start adding a Creation Profile, go to Salestio > Profiles > Creation Profiles:
Give a name to your Creation Profile, and pick the combination of the below attributes that best describes your items:
- Who made it
- When make it
- What is it
Related help article on help.etsy.com: What Can I Sell on Etsy?
Add a mapping to the Creation Profile
To start adding a new mapping, select the mapping condition that will be applied to identify the Shopify products, followed by the corresponding Etsy category.
The easiest way is to set the condition field to a Product Type. In this case, Salestio will use the Product Type field from your Shopify product page. You can select multiple conditions.
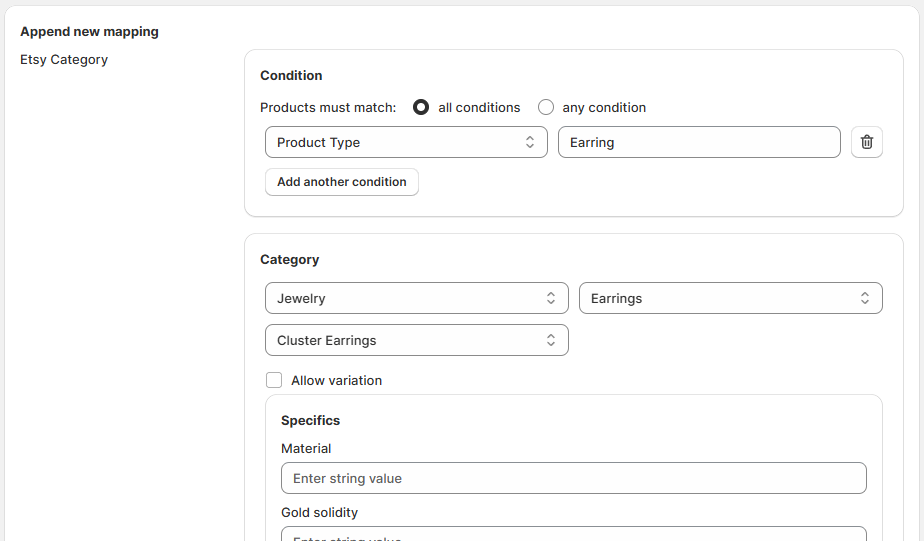
Each mapping should use a unique set of Conditions. For example, if you want to sell Fine Earrings made from various metal types, creating 2 or more mappings with the Condition “Product Type equals Earring” would not work for you, as it can be added only once. In such cases, consider adding tags to your Shopify product pages to create Collections. They might be “Gold” and “Silver” in the case of Jewelry. So, the correct mappings here might look like this:
- “Product Type equals Earring AND Collection equals Gold”
- “Product Type equals Earring AND Collection equals Silver”
The same might be added for rings, necklaces, and bracelets. This is an example of Jewelry. Depending on what products you want to sell on Etsy, Product Types, Collections, tags, and sets of conditions will vary.
After selecting the Etsy category, a list of available product specifics will appear below. Add the product details as needed.
To create Etsy products with variants, enable the “Allow variation” checkbox and set the related options:
- Variation Theme — indicates the Etsy options with variations. If the variation option you want to add is missing from the list, you can select the “Custom Property” option.
- Variation Option — indicates the Shopify variation option that will be mapped to the selected Variation Theme.
Remember to save the mapping and save the Creation Profile after adding the necessary details.
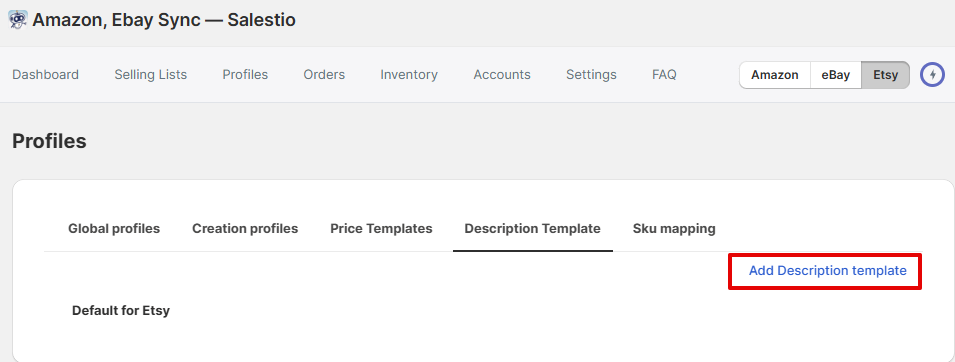
Customize the Description Template (Optional)
Adding a Description Template is an optional step. By default, Salestio will use the description from the Shopify product page. If you want to customize the look of the Etsy descriptions, now is the time to do so.
To access existing Description Templates and create new ones, navigate to the Profiles tab from the application menu, and select the Description Templates subtab. Click the “Add Description template” button to create a new template.
Use the built-in editor to add Shopify variables like titles, metafields, pictures, and more. When an item is sent to Etsy, Salestio will dynamically get the relevant field for each product and compose a description based on the template.
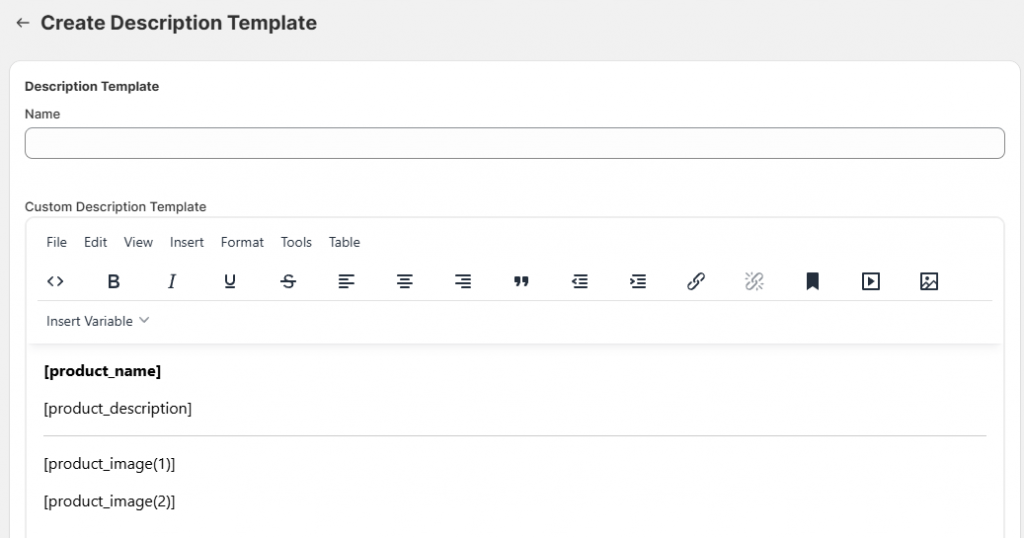
Remember to save the Description Template after making changes.
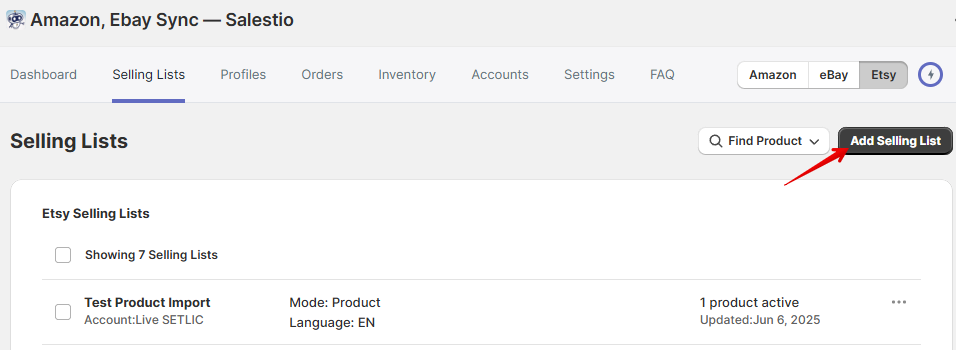
Create a Selling List
At this point, we have the pieces to set up a Selling List with the items that we want to sell. To create a new Selling List in Salestio, go to the Selling Lists tab:
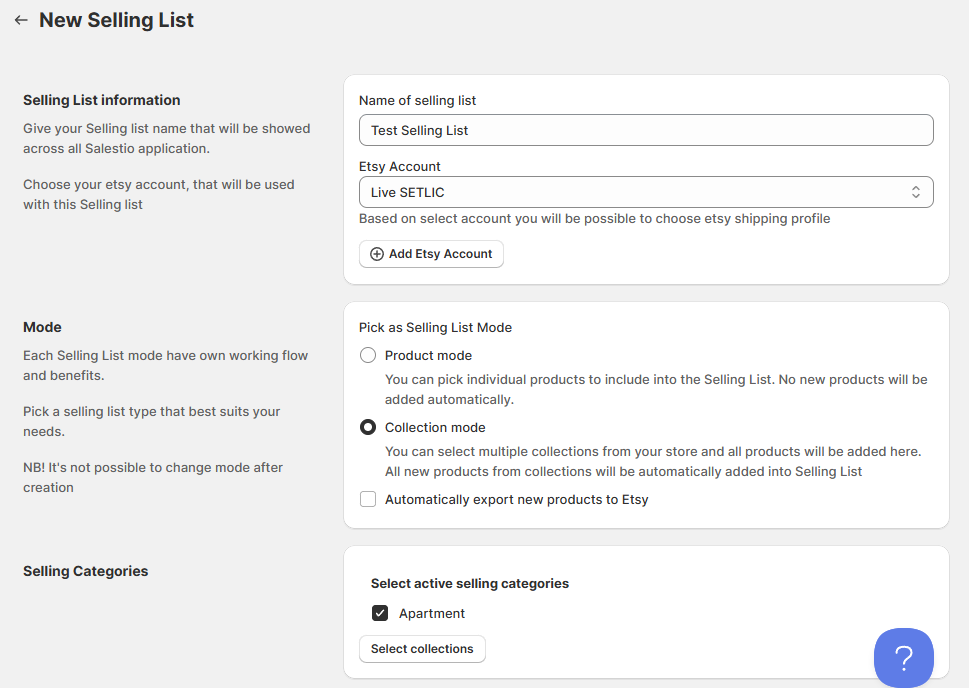
Start by entering a name of your choice for the Selling List, and select an Etsy account.
Some other fields will be unavailable until an Etsy account is selected.
Select the mode for the Selling List from the two options:
- Product mode: Shopify products can be added to the Selling List manually.
- Collection mode: products are added and removed from the Selling List automatically based on the selected Shopify Collections.
In Collection mode, select the collections on this page, below the Selling List mode settings.
In the next steps, select the listing language and renewal options. Salestio has Manual renewal as the default option. Please note that Automatic renewal can incur additional fees from Etsy. More details about the renewal options are in our blog post.
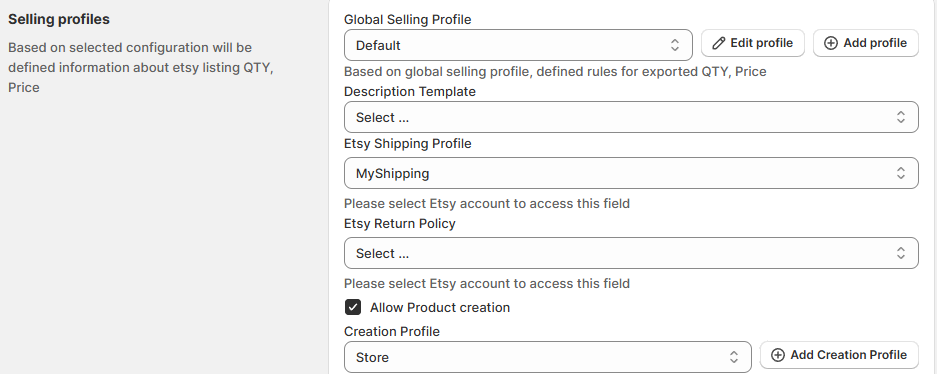
Select the profiles from the previous steps in the next section. Here you should set the Global Profile, Description Template (optional), Etsy Shipping Profile, and Return Policy (configured directly on Etsy.com).
To enable listing new products, tick the “Allow Product creation” checkbox and select the Creation Profile.
If your store offers calculated shipping, set the weight and dimensions settings (optional). Weight and dimension fields support number values, as well as Shopify metafields.
After adding all the settings, click “Add Selling List” at the top of the page.
Export the products to Etsy
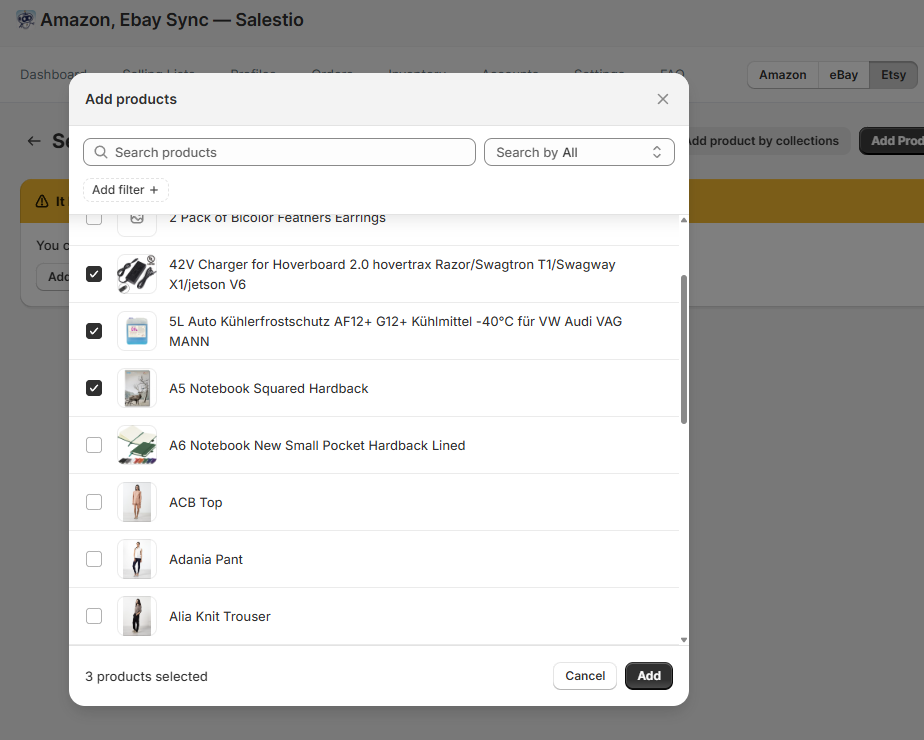
For a Selling List in Product mode, you will see an empty page after opening it. To add items, click one of the options at the top. Adding products by collections allows selecting whole groups of items for adding in bulk. As another option, click “Add Products” to add individual items.
For Selling Lists in Collection mode, the app will add the items automatically. Give Salestio a few minutes to fetch the item list.
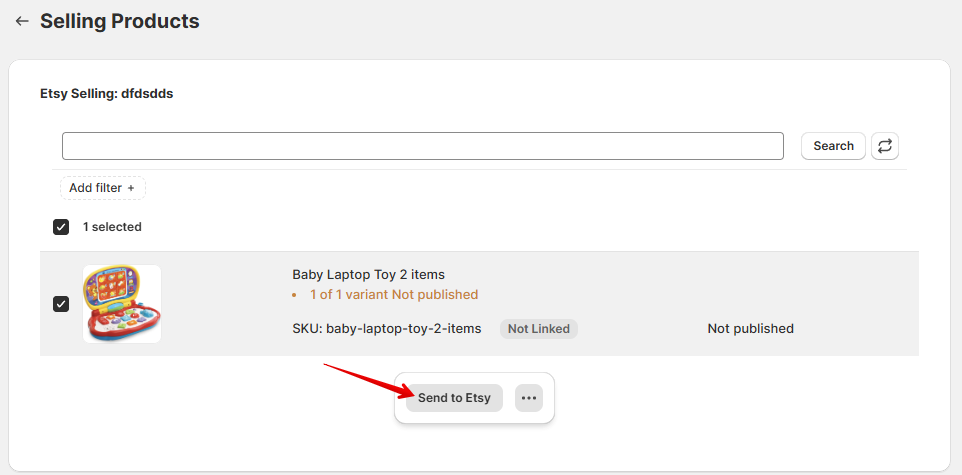
After new selling products are added to a Selling List, they will appear in the “Not Linked” status. This means that the product has not yet been sent to Etsy. To send the product, select it in the Selling List and click “Send to Etsy”. The status will change to “Pending Linking”:
The item will change the status to Linked in a few minutes, which means that the listing has been published. For all the “Linked” items, Salestio will keep syncing prices and quantities in the background. If you want to perform an update manually, select the item in the Selling List and click the “…” button at the bottom to access the quick actions.
Troubleshooting
For items resulting in an Error status, check the logs to learn more:
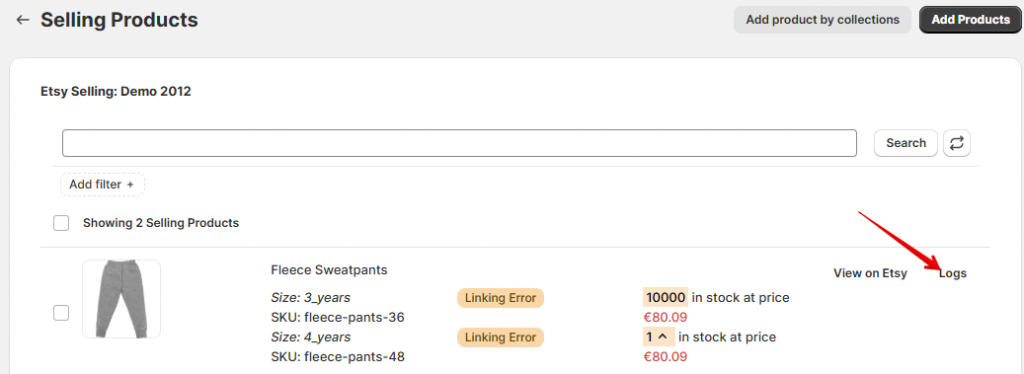
Look for error messages explaining the issue and try to resolve it. After making the changes, try sending the item again. For additional details on possible Etsy errors, check the article below:
List on Etsy: Common errors and how to fix them
Etsy category not found for product, please adjust Creation ProfileThe above error appears when the corresponding mapping or Creation Profile is not found. Follow the steps below to make sure that the profiles are configured correctly:
- Note the Shopify Category, Product Type, and Collection for the product in question. Check the mapping in the Creation Profile and make sure that the Conditions section corresponds to the attributes of this Shopify product.
For example, the mapping can be set to match all conditions or any condition. Make sure to select “any condition” to match products even if they are not in every selected category.
Remember to save the mapping and the Creation Profile after making changes.

- Check Selling List settings. Make sure that product creation is enabled and the correct Creation Profile is selected. Save the Selling List after making changes.

- Send the product to Etsy again.
Check more tips in a related article: Solving ‘Category Not Found’ Error on Etsy and eBay
Oh dear, you cannot sell this item on EtsyThis error means that the item does not qualify for sale on Etsy based on the attributes from the Creation Profile: “Who/When made it” and “What is it”.

To make sure that the products can be sold on Etsy, please check if the products fall under the following categories and pick the appropriate attributes in the Creation Profile:
- Handmade Items (stuff done by yourself or somebody in your company).
- Craft Supplies, components, materials, or tools that people may use to make their creations.
- Vintage Goods (20 years old or more).
If your store sells new products, “Finished products” have to be made by you or a member of your shop. Products made by another company have to be marked as “A supply or tool to make things”.
For vintage goods over 20 years old, you can mark them as a “Finished product” and “Made by another company or person”.
After verifying that the products can be sold on Etsy and editing the Creation Profile, try sending the items again.
More examples and an in-depth explanation on help.etsy.com: What Can I Sell on Etsy?
Quantity cannot be empty, at least one variant of the product must have stockTo resolve the above error, edit the product quantity in the store to add more stock. After adding more stock, try sending the item again.
Conversely, a different error appears when the stock is too high:
Quantity cannot be greater than 999Etsy does not support quantities over 999 for any product. This limitation counts the total quantity of all variations of the same product. For example, if a product has 2 variations with 600 stock each, the total quantity will be 1200, and the product will not be accepted. To resolve this, you can limit this number through the Global Profile in Salestio:
- Go to Salestio > Profiles > Global Profiles.
- Pick the currently active profile.
- Change the QTY mode to “Not more than”.
- Set a quantity limit in the “Item QTY Value” field (below 999).
- Save changes and send the product again.

If you have any unanswered questions, feel free to reach out to the team at support@salest.io, and we will do our best to help. Check out Salestio on the Shopify App Store.