06 Feb'26


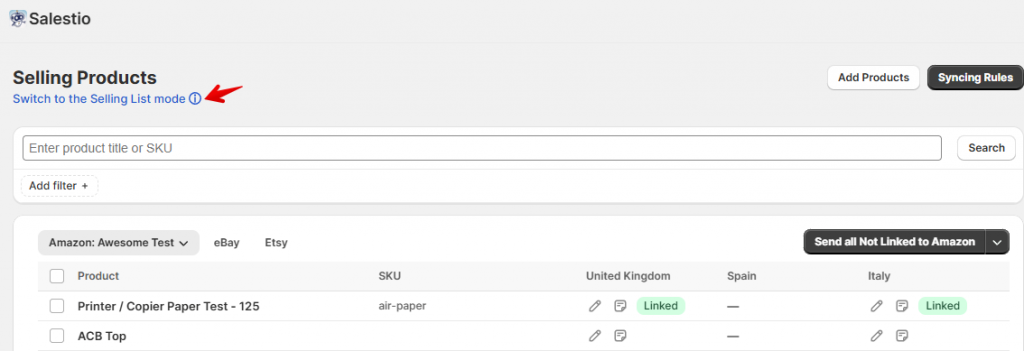
Salestio is introducing the Selling Products view for Shopify, where you can manage products from one page. If you have been using Salestio for some time, you might see it as an alternative to the Selling Lists, where you manage products in separate groups.
The new view combines the products from different platforms, marketplaces, and accounts into a single page. Today, we will tell you all about it and share a quick guide on the new features.
You can switch between the different views (Selling Products and Selling Lists) at the top of the page:
Add products
Start by adding your marketplace account to Salestio. To do so, go to the Accounts tab and click the “Add Account” button.
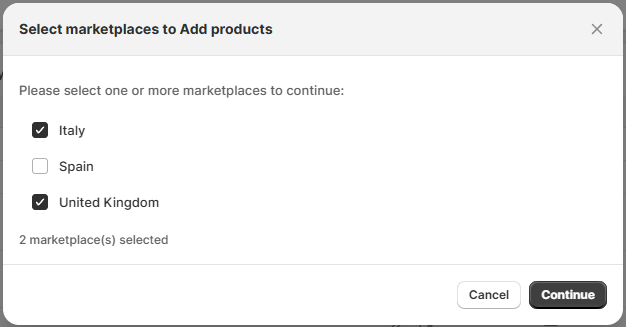
To start working with specific products, click “Add Products” at the top and select some of your Shopify items. If you are working with multiple marketplaces, confirm which ones should be used for the products. For example, when both Germany and Italy marketplaces are selected in the Accounts tab in Salestio, they will be displayed here.
If your Amazon account in Salestio has only one selected marketplace, then this step will be skipped. However, eBay accounts would still have multiple options.
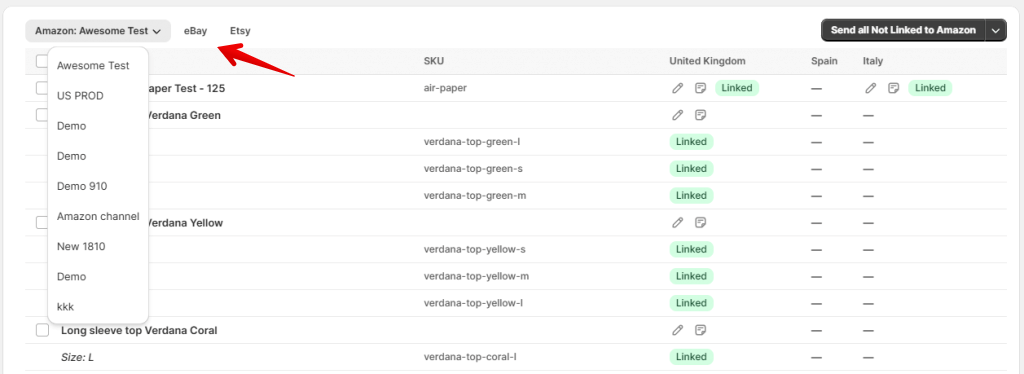
Selling Products view will display different navigation tabs depending on the added marketplace accounts. For example, if you only have an Amazon and an eBay account added, then only Amazon and eBay tabs will appear.
Click the tabs at the top of the list to switch between integrations. Click the tab again to pick the connected account (if multiple accounts are available). When the product is available on multiple marketplaces, Salestio will display the statuses and quantities separately in different columns.
To add marketplace information, like categories or product specifics, the Selling Products view offers two options: add the details individually through Listing Data or set up a Syncing Rule to apply it to multiple items.
Listing Data
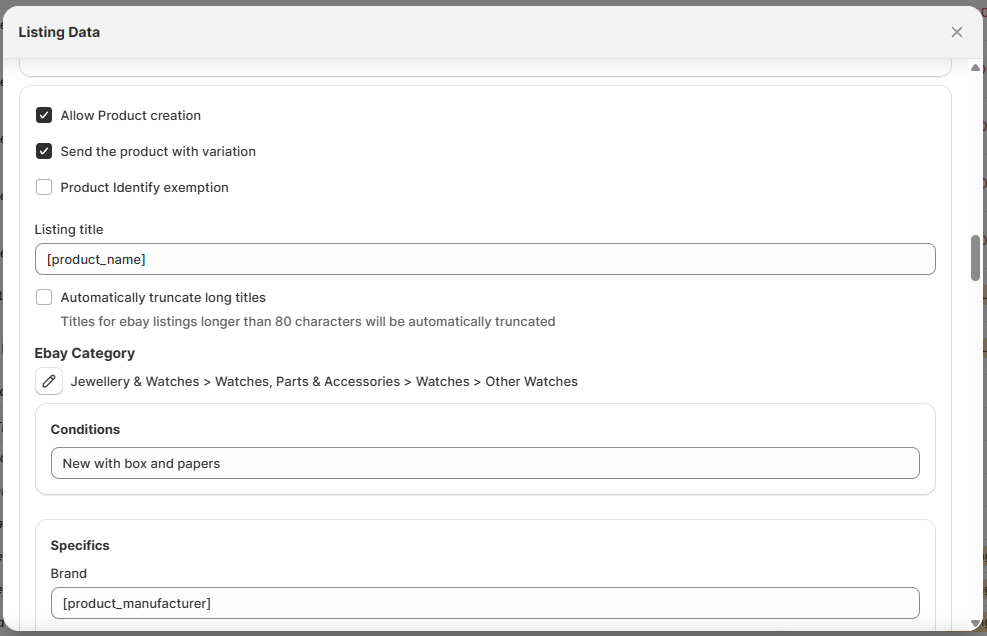
To set up the listing information for an individual product, click the pencil icon under the target marketplace. This page has a few key sections for adding information to the listings.

General product information
Here, you can add the details that are specific to each marketplace.
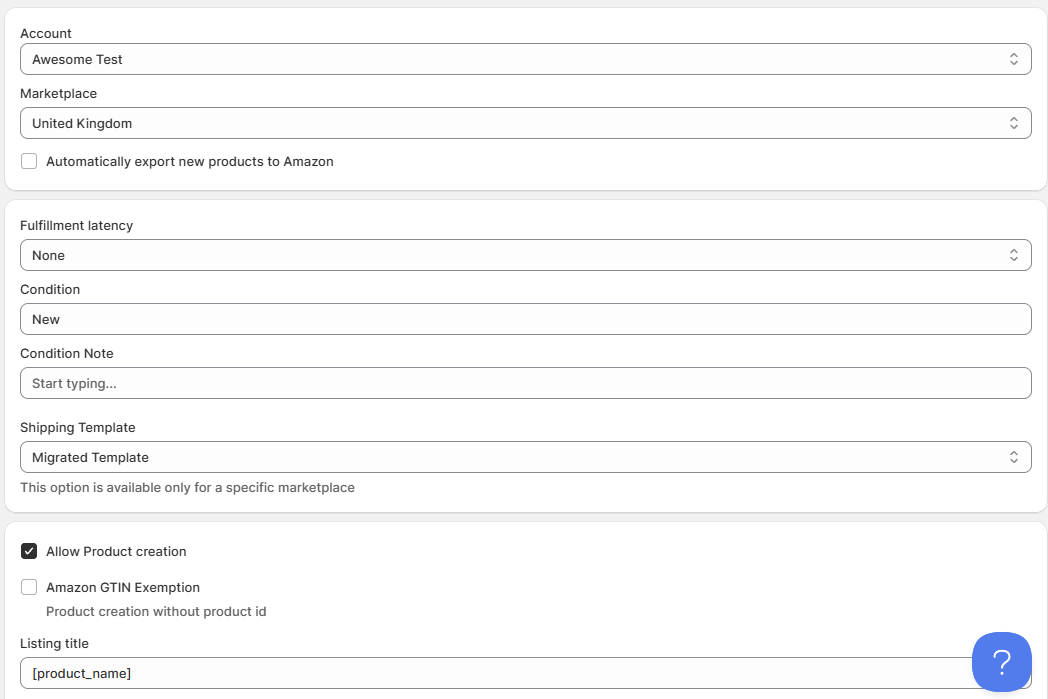
- For Amazon, add fulfillment latency, product condition and condition note. If you have a custom shipping template on Seller Central, pick it here.
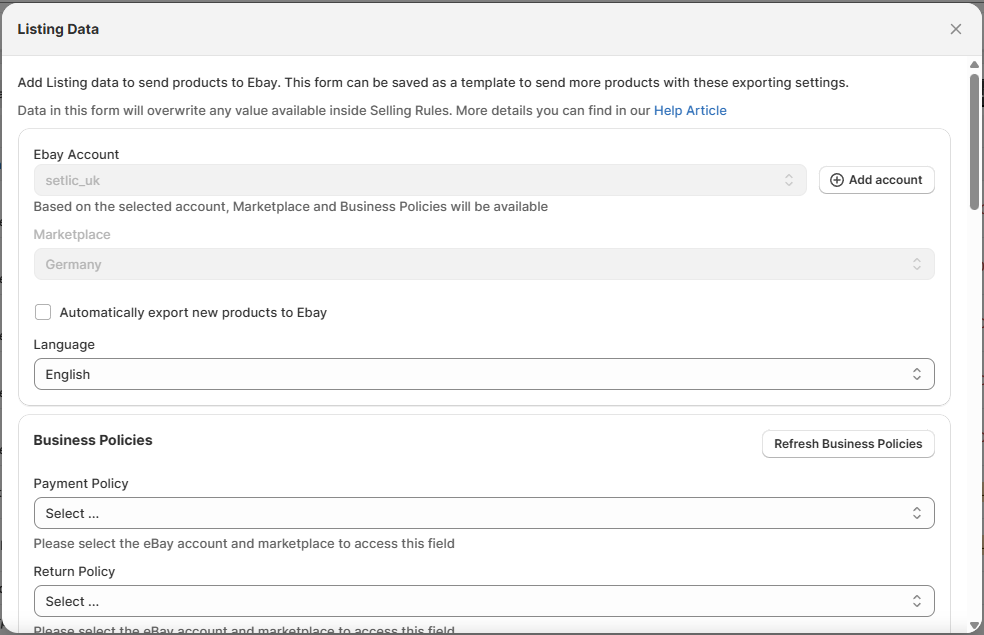
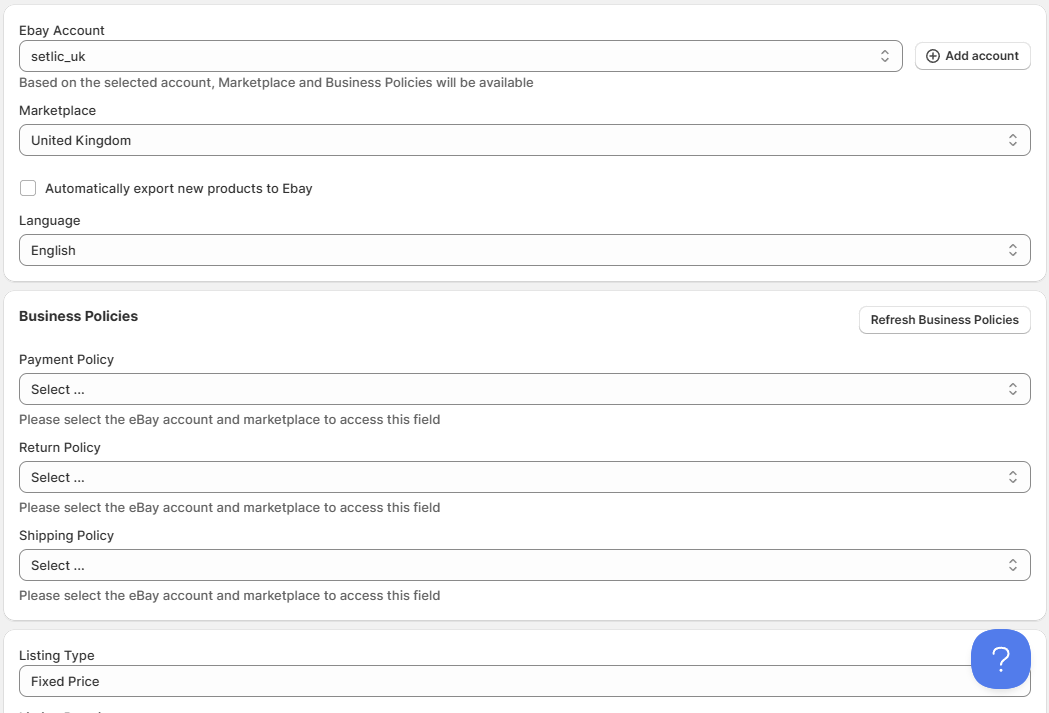
- For eBay listings, add the Business Policies (full guide here). Change the listing type if you want to start an auction.
If you have specific VAT settings, add them here.
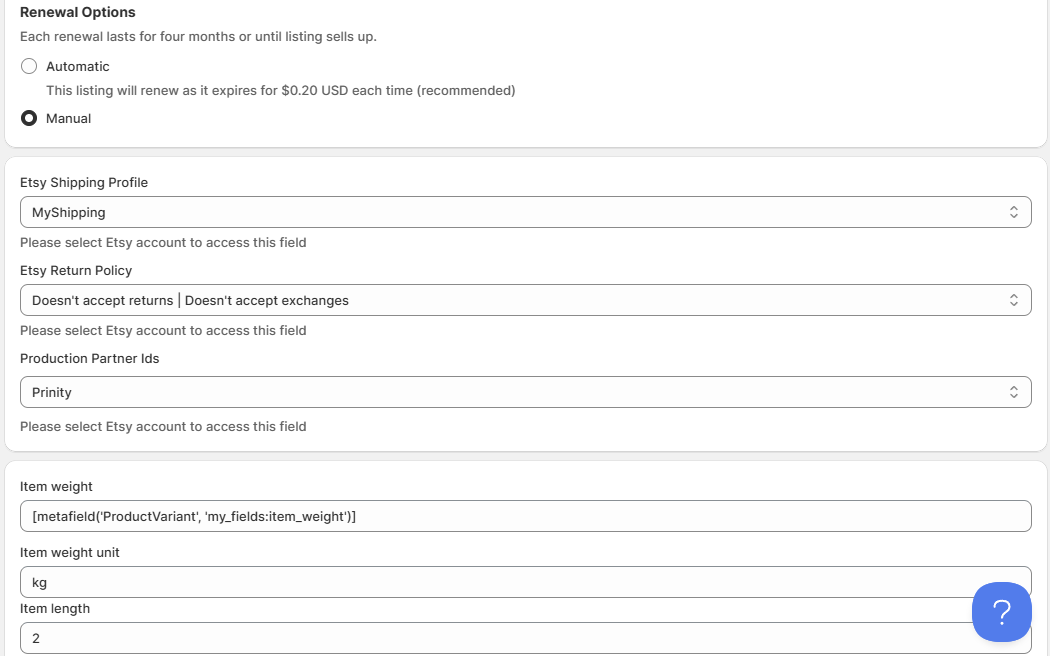
Make sure to fill out the Additional Shipping Details: country, location, and postal code. Weight and dimensions are also required when using calculated shipping. - For Etsy, set if you want manual or automatic renewal. See our blog post on the intricacies of Etsy renewal options.
Below that, pick the Etsy shipping profile and return policy. If you have a production partner, indicate it here.
Same as eBay, adding weight and dimensions is required for calculated shipping.
Product creation details
Below the general product settings, enable product creation to add the category and item specifics. This setting should be enabled for listing new products. Select “Allow Product creation” to add listing creation details.
If your products are already listed on the marketplace, skip adding the product creation details.
- For Amazon, this is only needed for products that do not exist in the marketplace catalog.
- For eBay and Etsy, creation data is always required to list new products.
Save the Listing Data preset for other products
At the bottom of the Listing Data page, enable the “Save Listing Data for future listings” option to apply the same settings to other products.
You can apply the preset to all products or only select product groups. To specify the product group, set a combination of filters for Shopify Product Types, Collections, and/or Categories.
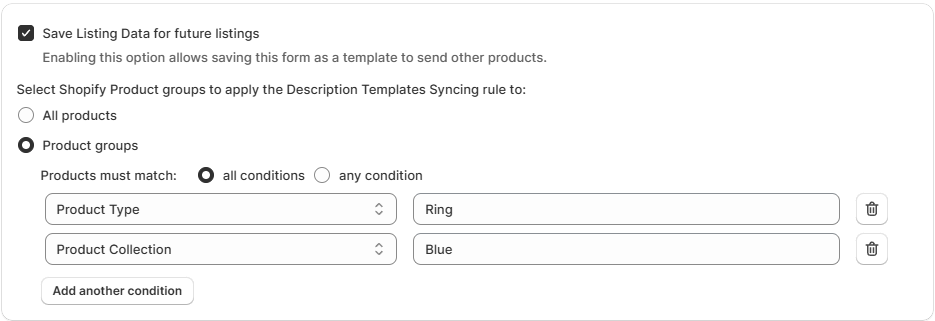
For example, our store has a variety of blue rings that should use the same set of product specifics on eBay. In our case, setting the Shopify Product Type to “Ring” and the Shopify Collection to “Blue” will apply this Listing Data preset to all blue rings added to our Selling Products view.
After the product is saved with this option enabled, you can review and edit this global preset in Syncing Rules.
Syncing Rules
Syncing Rules in Salestio are a set of product details that are automatically applied based on predefined product groups. This is a faster way to add product details for large product groups, instead of adding them to each product separately.
When setting up each rule, select whether you want to apply it to all products or only specific groups. Salestio automatically applies the matching Syncing Rule depending on the items in the list.
The hierarchy of applied Syncing Rules is as follows:
- Listing Data added to the individual product (if any)
- Syncing Rule with a filter match
- Syncing Rule configured for all products
The following types of Syncing Rules can be applied to the products:
- Price & QTY rule
- Amazon/eBay/Etsy rule
- eBay Store Mapping
- Description Template
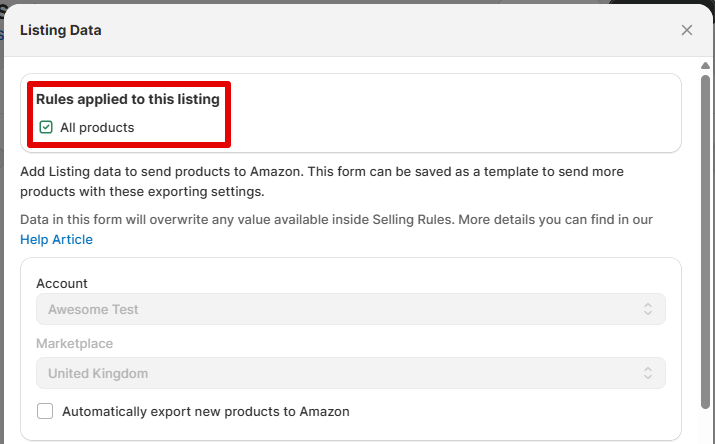
To verify if any specific rule is applying to an item, find the product among the Selling Products and open its Listing Data:
Price & QTY rule
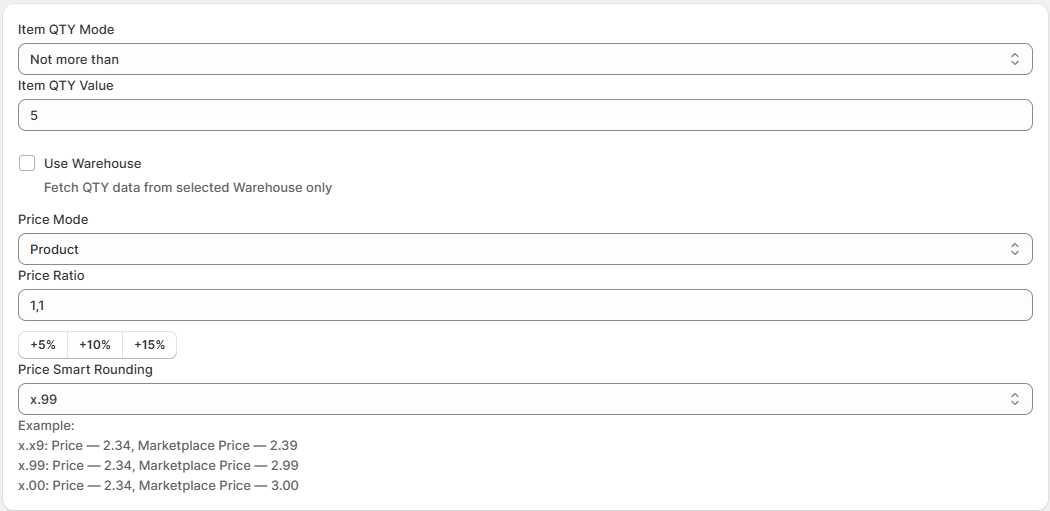
Salestio comes with a default Price & QTY rule for all products. The default preset sends the exact prices and quantities as they appear on the Shopify product page.
Set alternative modes for product syncing, pick a specific Shopify warehouse, or enable price rounding. Learn more about available options for customizing prices and quantities in the respective blog articles. Saved Price & QTY rules can be applied to any account or marketplace.
Amazon rule
In the Amazon tab, add Listing Data templates for your Seller Central items. Each template is saved for a specific account and marketplace. If you are selling on multiple marketplaces, make sure to add a Syncing Rule for each one or set up individual Listing Data for the rest of the products without a template.
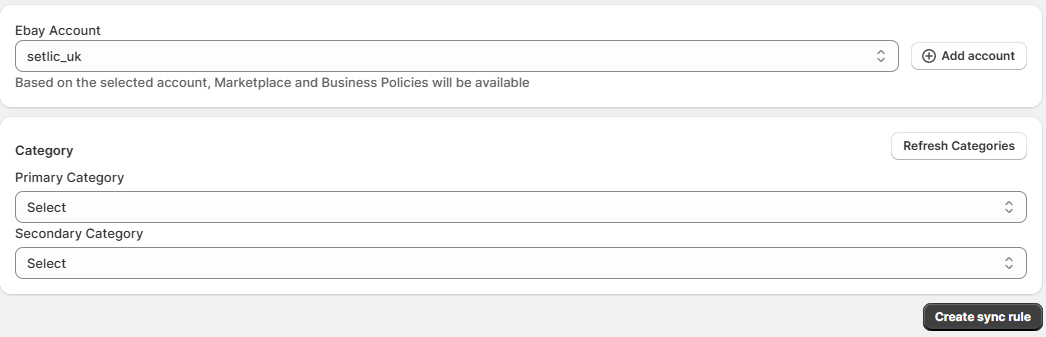
In the Amazon Syncing Rule, set the fulfillment latency, product condition, and shipping template. Optionally, add a condition note. Below, enable product creation if you need to create new products in the Amazon catalog. With enabled product creation, set the target Amazon category and add product specifics below.
eBay rule
In the eBay tab, add product creation details related to eBay accounts. In this Syncing Rule, select the target eBay account and marketplace. Set the listing type (auction/GTC), settings related to VAT, shipping location/dimensions, and Business Policies.
At the bottom, enable product creation to set the target eBay category and related item specifics. Salestio will automatically apply the saved specifics when publishing the products.
eBay Store Mapping
If you are a user of the eBay Store program and have some custom categories in your store, set up the eBay Store Mapping to make use of them. In this profile, you can select the custom categories to apply to the items:
Etsy rule
Here, you can add profiles used for sending products to Etsy.
Enable automatic renewal or leave it at manual here. Some profiles have to be set up on Etsy first. This includes Shipping Profiles, Return Policies, and Production partner IDs. The options in these fields depend on your Etsy store configuration. Below, add item weight and dimensions if the products will be using calculated shipping.
Enable product creation to configure product tags and specify what kind of product it is. Remember that Etsy is focused on vintage and items related to arts & crafts. Check the help article from Etsy for more details on what kind of items you can sell.
Set the target Etsy category and add product specifics below.
Description Templates
In Description Templates, set up a preset to compose a description for the marketplace listings. Use the editor to add custom text or product information from Shopify, including Metafields.
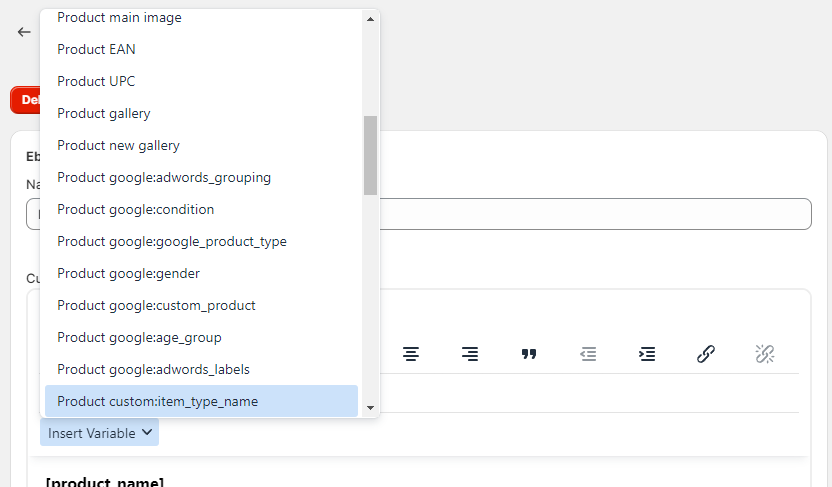
Keep in mind that Amazon and Etsy descriptions support only simple text. eBay allows CSS formatting, so there is more creative freedom and options to make the listing look fancier. Check out our free library of eBay Description Templates for a simple way to get started.
Manage products
After all the Syncing Rules and Listing Data are configured, send the items to the marketplace. There are two ways to publish the products:
- Select the items in the list and click the “Send to *marketplace*” button at the bottom
- Click “Send all Not Linked…” to publish all possible items in the Not Linked status
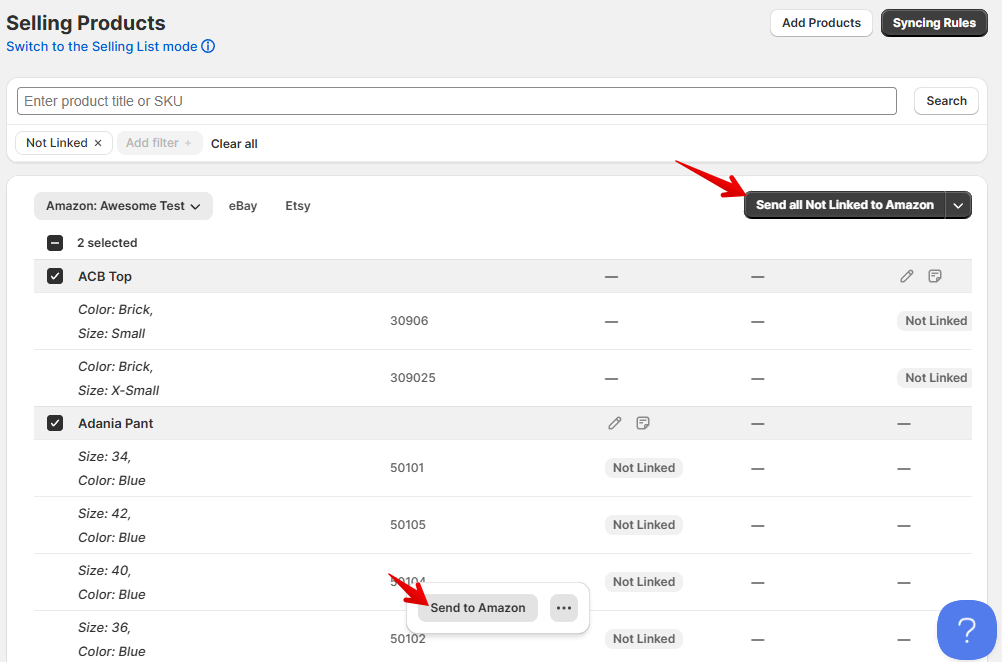
After sending the products, check the status in the list. “Linked” items will keep syncing according to Shopify updates. For items with an error status, check the logs to find out more details on the Linking error:
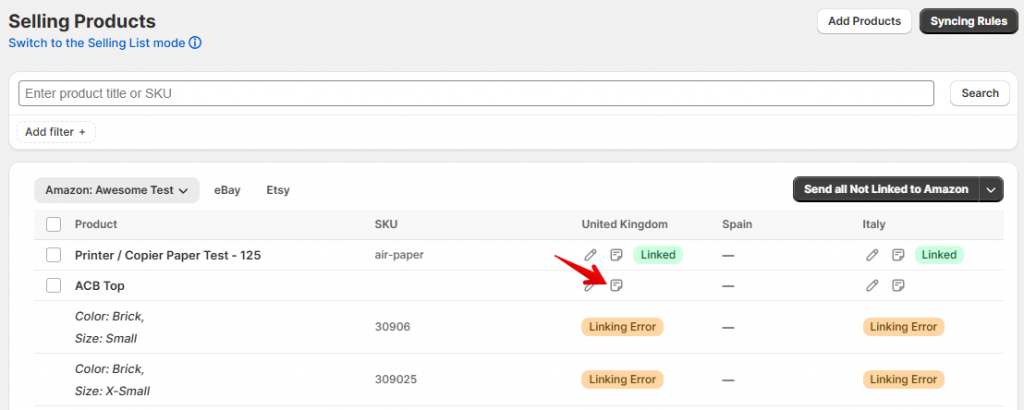
See the help articles for more troubleshooting details about your specific platform:
Selling Products view introduces a way to quickly perform mass actions on all Linked products. Click “Bulk Actions” to see the available options:

From here, you can run an update for all of the connected products, stop the listings on the marketplace, or remove the connection between Salestio and marketplaces.
If you have any unanswered questions, feel free to reach out to the team at support@salest.io, and we will do our best to help. Check out Salestio on the Shopify App Store.