20 Nov'26
Salestio helps sellers expand their store to external marketplaces. Today, we will focus on publishing existing Ecwid products on Amazon.
Connect an Amazon account
Salestio requires a Pro Seller account on Amazon for publishing and synchronizing the items. The account should be able to list items. You can verify if your account is ready by listing any item directly through Seller Central.
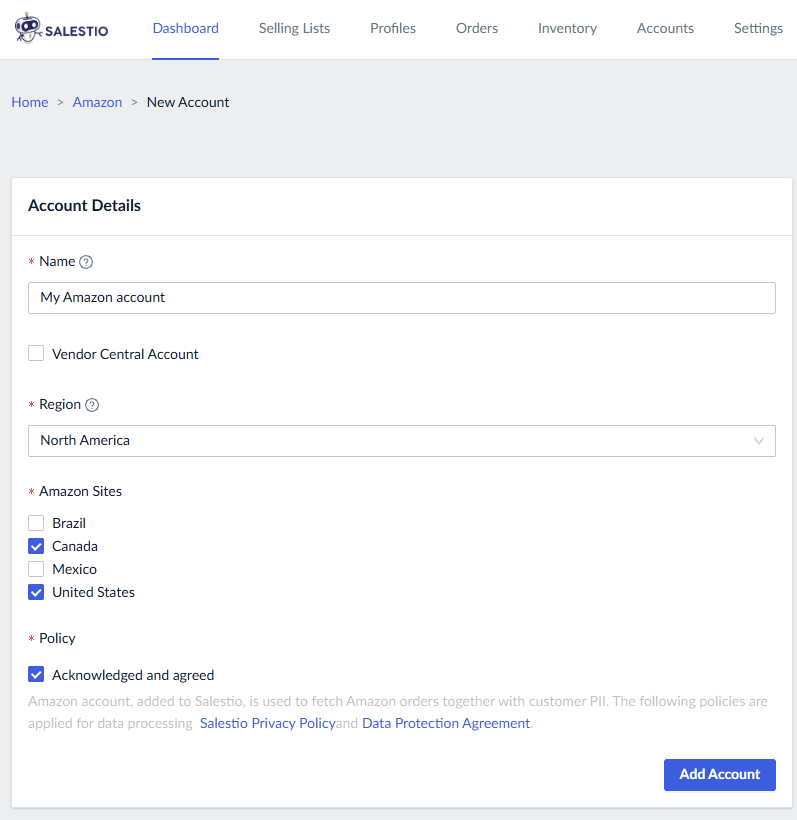
To connect the account, go to Salestio > Accounts tab > Add Account.
If you haven’t connected any Amazon accounts yet, you can jump to this page right from the Salestio app Dashboard.
You will be redirected to the “Assign account” page. Pick any account name and indicate the target marketplaces, then save the account to log in on Amazon.
When configuring the account in Salestio, avoid picking extra marketplaces if your account is not authorized to sell on them.
Add a Selling List
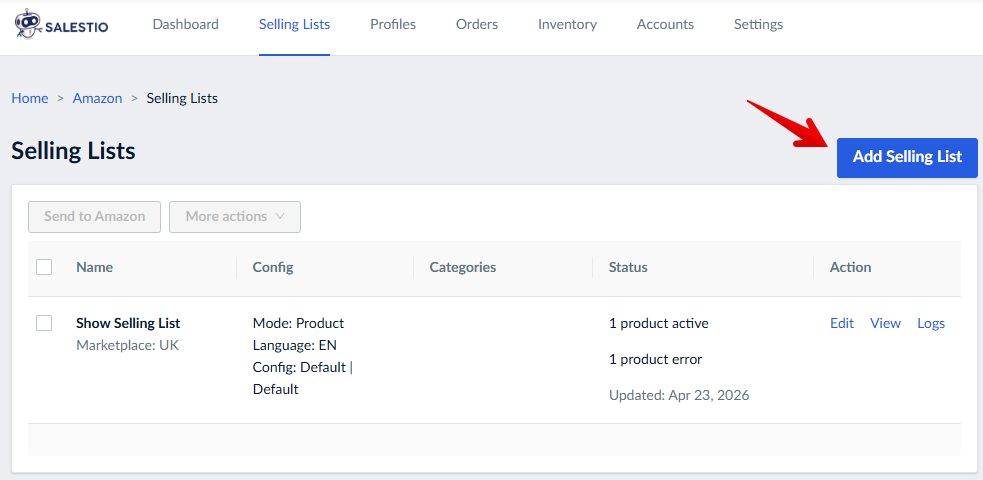
Selling Lists in Salestio organize your items into groups with the same synchronization rules. This is where you send items to Amazon, update existing ones, and check their status. To add a new Selling List, go to Salestio > Amazon > Selling Lists tab and click Add Selling List:
Pick a name for your Selling List and select the connected Amazon account. Next, pick the mode for this list:
- Product mode: add and remove items manually. Editing the product list will be available after the Selling List is created.
- Category mode: items will be added and removed from the Selling List automatically based on the content of the selected Ecwid categories.
When using this mode, select the categories below this section.
In the next section, pick the Amazon marketplace. Make sure that this marketplace is active for your Seller account and that it was selected during the account setup in Salestio. Marketplace selection affects which profiles are available in the next steps.
Related: Selling on multiple Amazon marketplaces
Lastly, pick the Selling Profiles. Salestio comes with a set of default presets, which you can add here. Pick the default options if you want Amazon listings to have the same price/quantity and other settings as your main store. Check the in-depth guides below for adding more profiles and customizing the sync:
How to Manage Listing Quantities with Salestio
Custom Pricing Rules for eBay and Amazon Listings
Prepare to publish the items
Products are added to Selling Lists depending on the selected mode:
- If you picked Category mode, new items will appear automatically. Give the app a few minutes to populate the list based on your Ecwid categories.
- In Product mode, items should be added manually. Click “Add Products” at the top and select the items to include from the list.
Confirm the product identifiers
Amazon is based on a unified catalog of products, with different sellers joining or leaving shared products pages. Salestio will need a barcode, like EAN or UPC, to identify your Ecwid product and place it on the correct Amazon page.
Add the barcode to the Ecwid product page or indicate the ASIN in the Selling List.
Related: SKUs and Barcodes: Understanding Product Identifiers
Send products to Amazon
After all the profiles are configured, send the items to the marketplace. There are multiple ways to publish the products:
- Send products one by one: select the items in the Selling List and click the “Send to Amazon” button at the top.
- Send in bulk: go to the Selling Lists tab and select the entire Selling List here, then run the “Send to Amazon” action.
- Automatic publishing: in Category mode, you can enable the “Automatically export new products to Amazon” option in Selling List settings. Whenever new items appear and this option is on, they will be sent to the marketplace right away.
After the items are sent, their status will change to Pending Linking. Check the status in a few minutes to see the results of publishing. Successfully published items will end up in the Linked status:

Troubleshooting
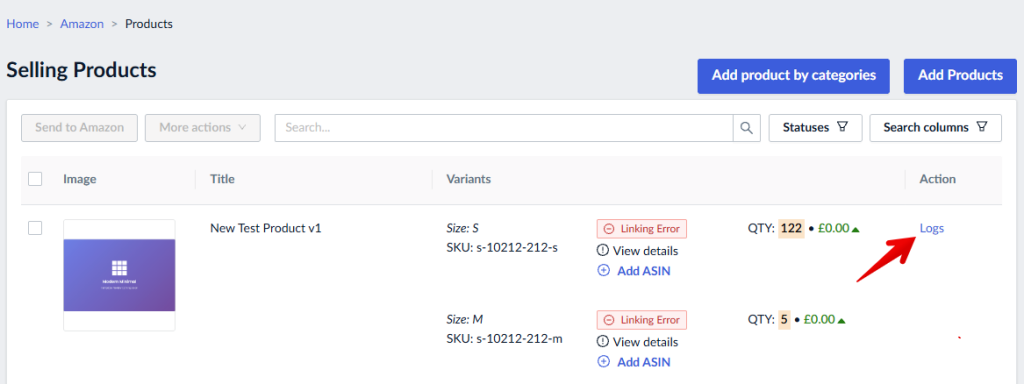
If any products have an error status, click “Logs” and look for the latest messages. Logs indicate if some information is missing, a seller account needs an update, or if there is an issue in the app configuration.
A quicker way to see the recent issues is “View details”: this button shows the most recent error message.
Selling Variant with sku 'awesome-sku' action was completed with an error. externally_assigned_product_identifier: 'External Product ID' is required but missing.This error means that Amazon did not receive any barcodes for the item. As mentioned earlier, each item can be identified by a GTIN barcode like EAN/UPC, or by an ASIN. Check if the identifier is correctly added (barcode on the Ecwid product page or ASIN in the Selling List) and try sending the item again.
Selling Variant with sku 'awesome-sku' action was completed with an error. merchant_suggested_asin: 'Merchant Suggested ASIN' is required but missing.This error means that your product does not exist in the Amazon catalog yet. It can also mean a typo in your barcode, so it is worth double-checking if the item is on Amazon.
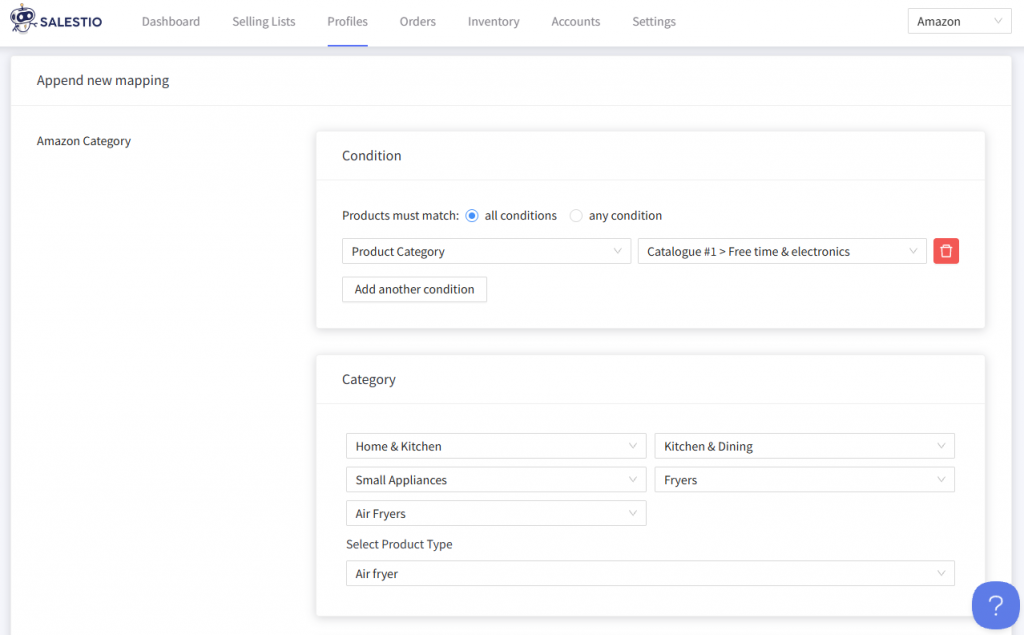
To create new items, Amazon requires additional information, and you can provide this through a Creation Profile:
- Add a Creation Profile from Salestio > Profiles tab
- Enable Product Creation in the Amazon Profile
- Send the products again
List on Amazon: Common errors and how to fix them
If you want to start selling on Amazon, Salestio can help by automating the process. Check out Salestio on the Ecwid App Market and start a 14-day Free trial.